Keeping good records of your cattle observations is not only a legal requirement (in Australia at least, according to NFAS) but it can help you better manage your heat risk in the future. Understanding which days your cattle are showing early signs of heat stress and keeping track of them will allow you to better understand your triggers for action.
That is why we have developed Kite’s Cattle Observation Dashboard. Once a cattle population is set up (which can bring data directly in from your RAPs) you can easily collect a record of your cattle every day.
The Cattle Observations Dashboard is available for everyone and we strongly encourage you all to use it!
Premium and Standard subscriptions will also see a summary of the cattle observations collected in the previous 24 hours on their toolbox reports. The toolbox report will have everything you need to keep on top of the heat risk at your feedlot.
See here for more on how to take good quality cattle observations.
How to use the Cattle Observations Dashboard
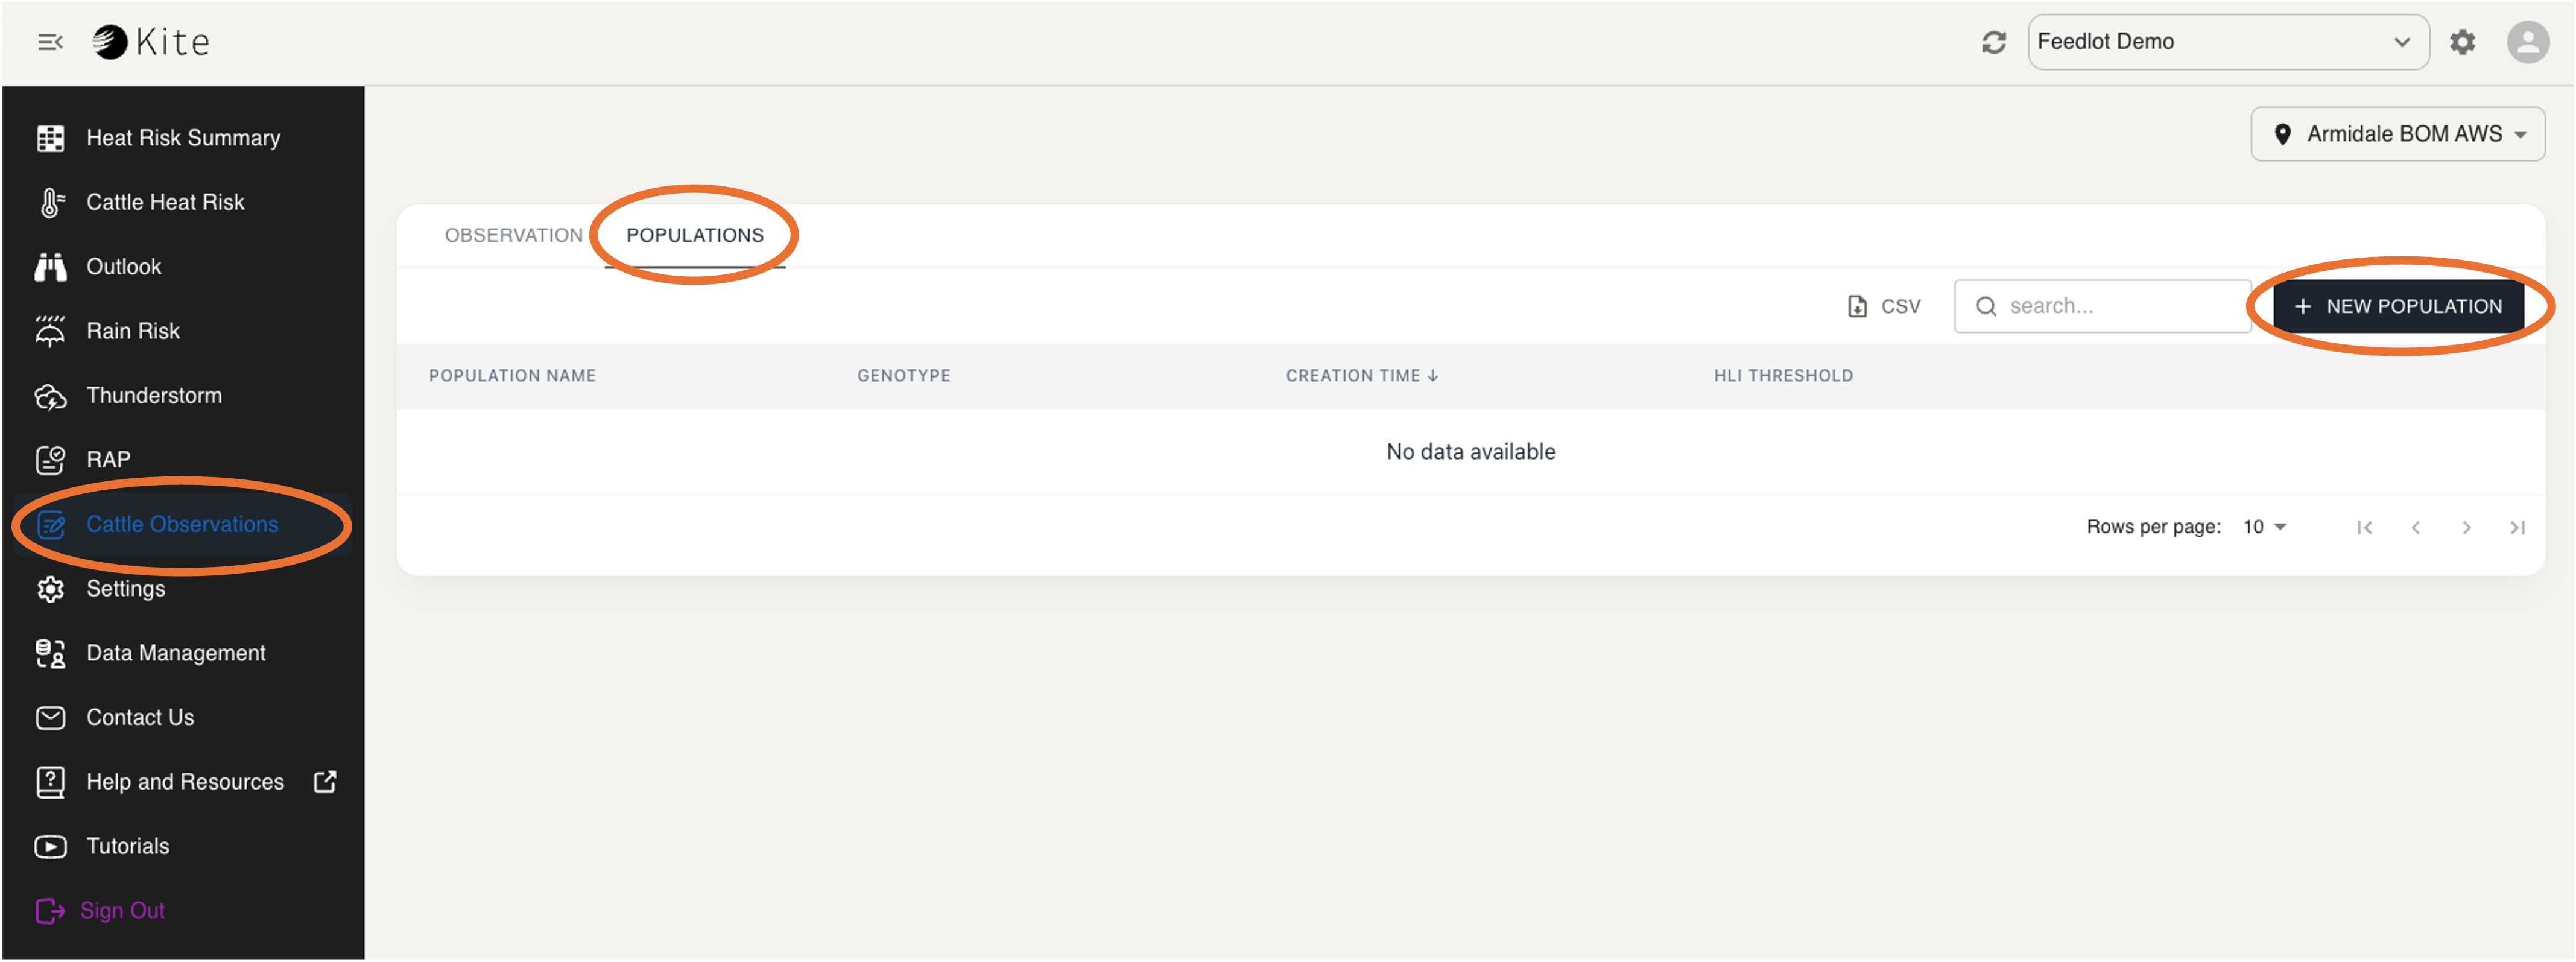
The Cattle Observations Dashboard can be accessed by selecting the Cattle Observations menu item in Kite.
Creating a New Population
Before you start recording observations, you need to specify the cattle population/s you will monitor.
-
Go to the Populations tab
-
Select the + New Population button
-
A window should pop up that looks like this:

Using an existing RAP population
-
If you already have a cattle population set up in a RAP, you can import this population easily using the Import data from RAP option. Select the RAP population you want to use from this dropdown.

-
Once you select the RAP population, all fields are automatically filled in with that population’s information. All you have to do is enter its name in the box at the top, and select Create.
Creating a completely new population
-
If you want to create a new population which you haven’t used in a RAP before, you must enter the following information (any fields with * are required):
-
Cattle population name - the name which you will use to refer to this population in the future
-
Cattle type
-
Coat colour
-
Days on feed
-
Shade provision (at midday)
-
Pen aspect
-
-
You can also provide information in the optional fields if you know the answers.
-
Select Create.
Managing Populations
In the populations summary table (shown below), you can now view your created population's:
-
Name
-
Genotype
-
Creation time
-
HLI Threshold
You can also download this information as a CSV file by clicking the CSV button.
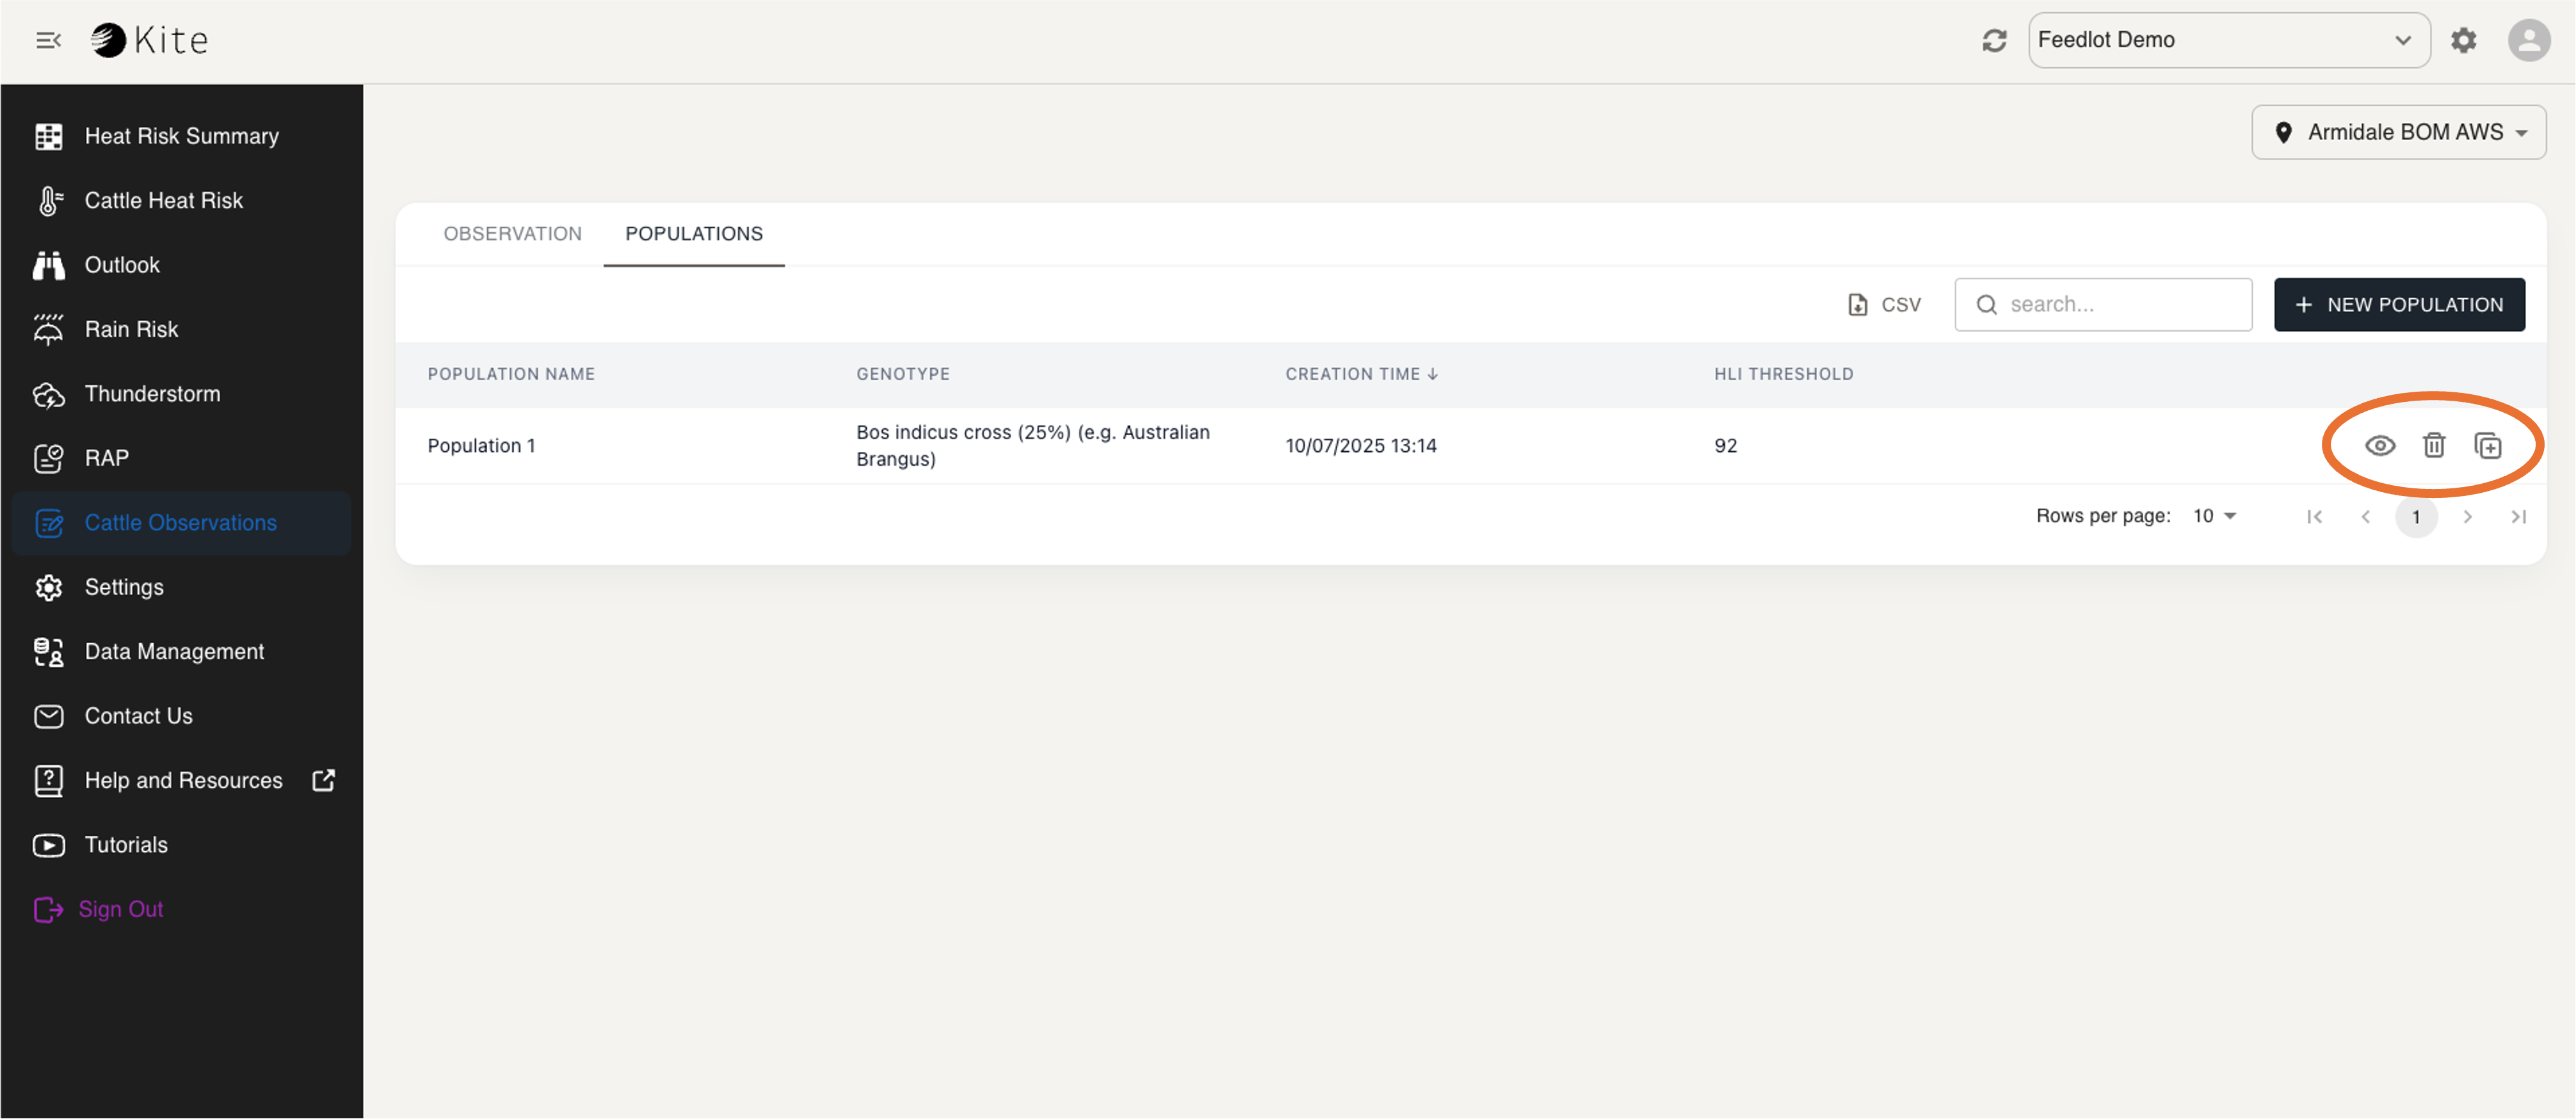
Using the menu circled above, you can:
-
View a population’s full information by selecting the eye icon.
-
Delete a population by selecting the bin icon.
-
Clone a population by selecting the copy icon.
Cloning a population allows you to save time when creating new populations. Select the copy icon in the menu circled above and a Clone population window should pop up, with all fields automatically filled in with the original population’s information. All you have to do is make any changes to the selections and enter the new population’s name, then select Create.

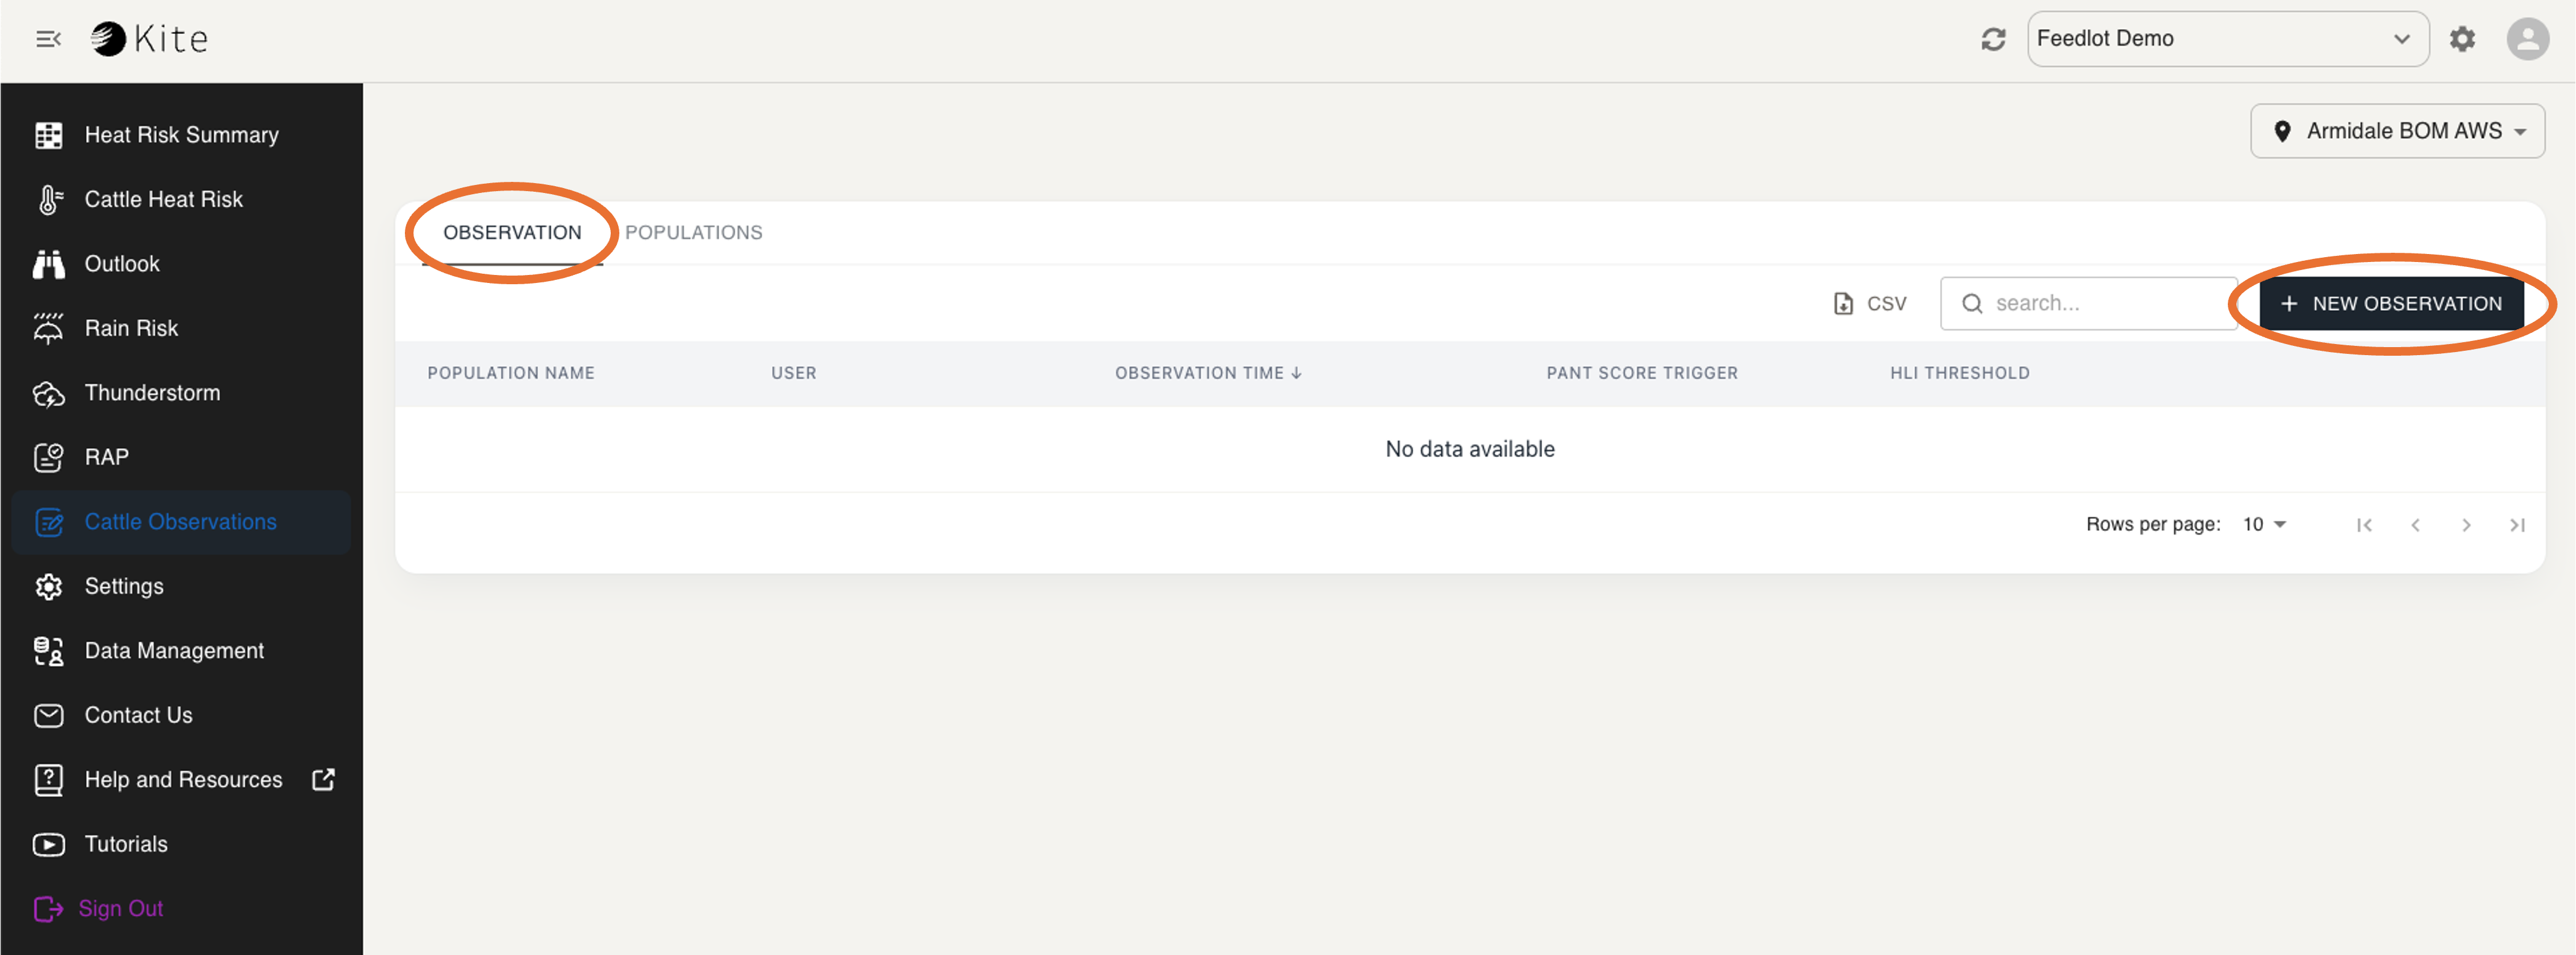
Recording a New Observation
Now that you have created your cattle population/s, you can start recording observations.
-
Go to the Observation tab
-
Select the + New Observation button
-
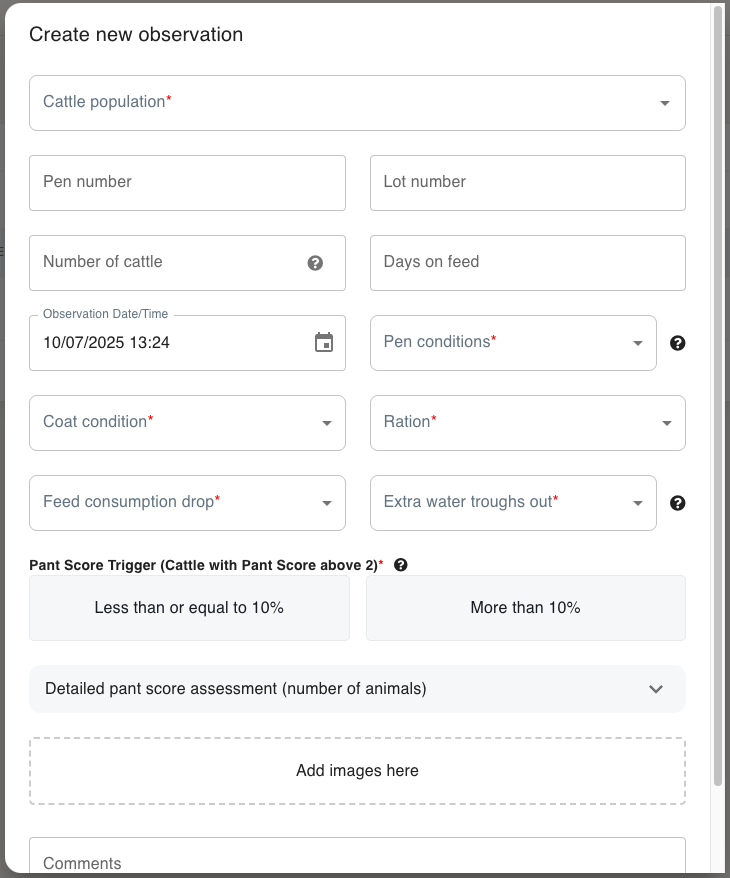
A window should pop up that looks like this:
-
You must enter the following information (any fields with * are required):
-
Cattle population - the names of the populations (1 or more) being observed
-
Pen conditions
-
Coat condition
-
Ration
-
Feed consumption drop
-
Extra water troughs out
-
Pant Score Trigger - see details below
-
-
You can also provide information in the optional fields if you know the answers.
-
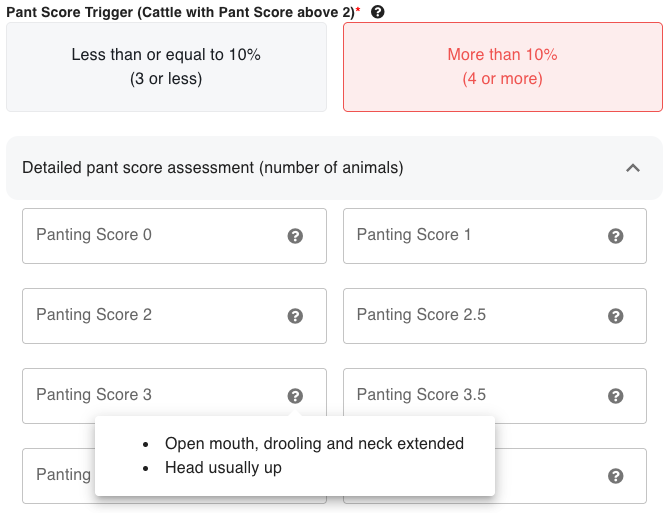
To complete the Pant Score Assessment you have two options:
1) Use the quick option of assessing whether the Cattle Pant Score Trigger was exceeded, with a selection of yes or no. Consider whether the number of cattle observed with pant scores above 2 was more than 10% of the cattle in each pen. If you’re unsure of specific numbers, just consider:
-
Less than or equal to 10% means not many animals have pant scores above 2.
-
More than 10% means a noteworthy number of animals have pant scores above 2.
If you fill out the Number of Cattle field, 10% of this number will be automatically calculated for you, so you can easily make your decision (shown in the image below).

2) You can also use the Detailed Pant Score Assessment. For this, you can enter the number of cattle observed with each panting score. For information about symptoms of each panting score, hover over its 'i' icon (shown below).
You will still need to select the Pant Score Trigger before selecting Create.
-
Optionally, you can also upload photos or videos or add comments about your observation.
-
Once you’ve filled out all the information, select Create.
Managing Observations
In the observations summary table (shown below), you can now view your created observation’s:
-
Name
-
User (who created it)
-
Observation time
-
Pant score trigger (whether it was exceeded)
-
HLI Threshold
The HLI Threshold can be used to determine which AHLU category you should be looking at for these cattle. If the pens are wet it may be considerably lower than you expect!
You can also download this information as a CSV file by clicking the CSV button.
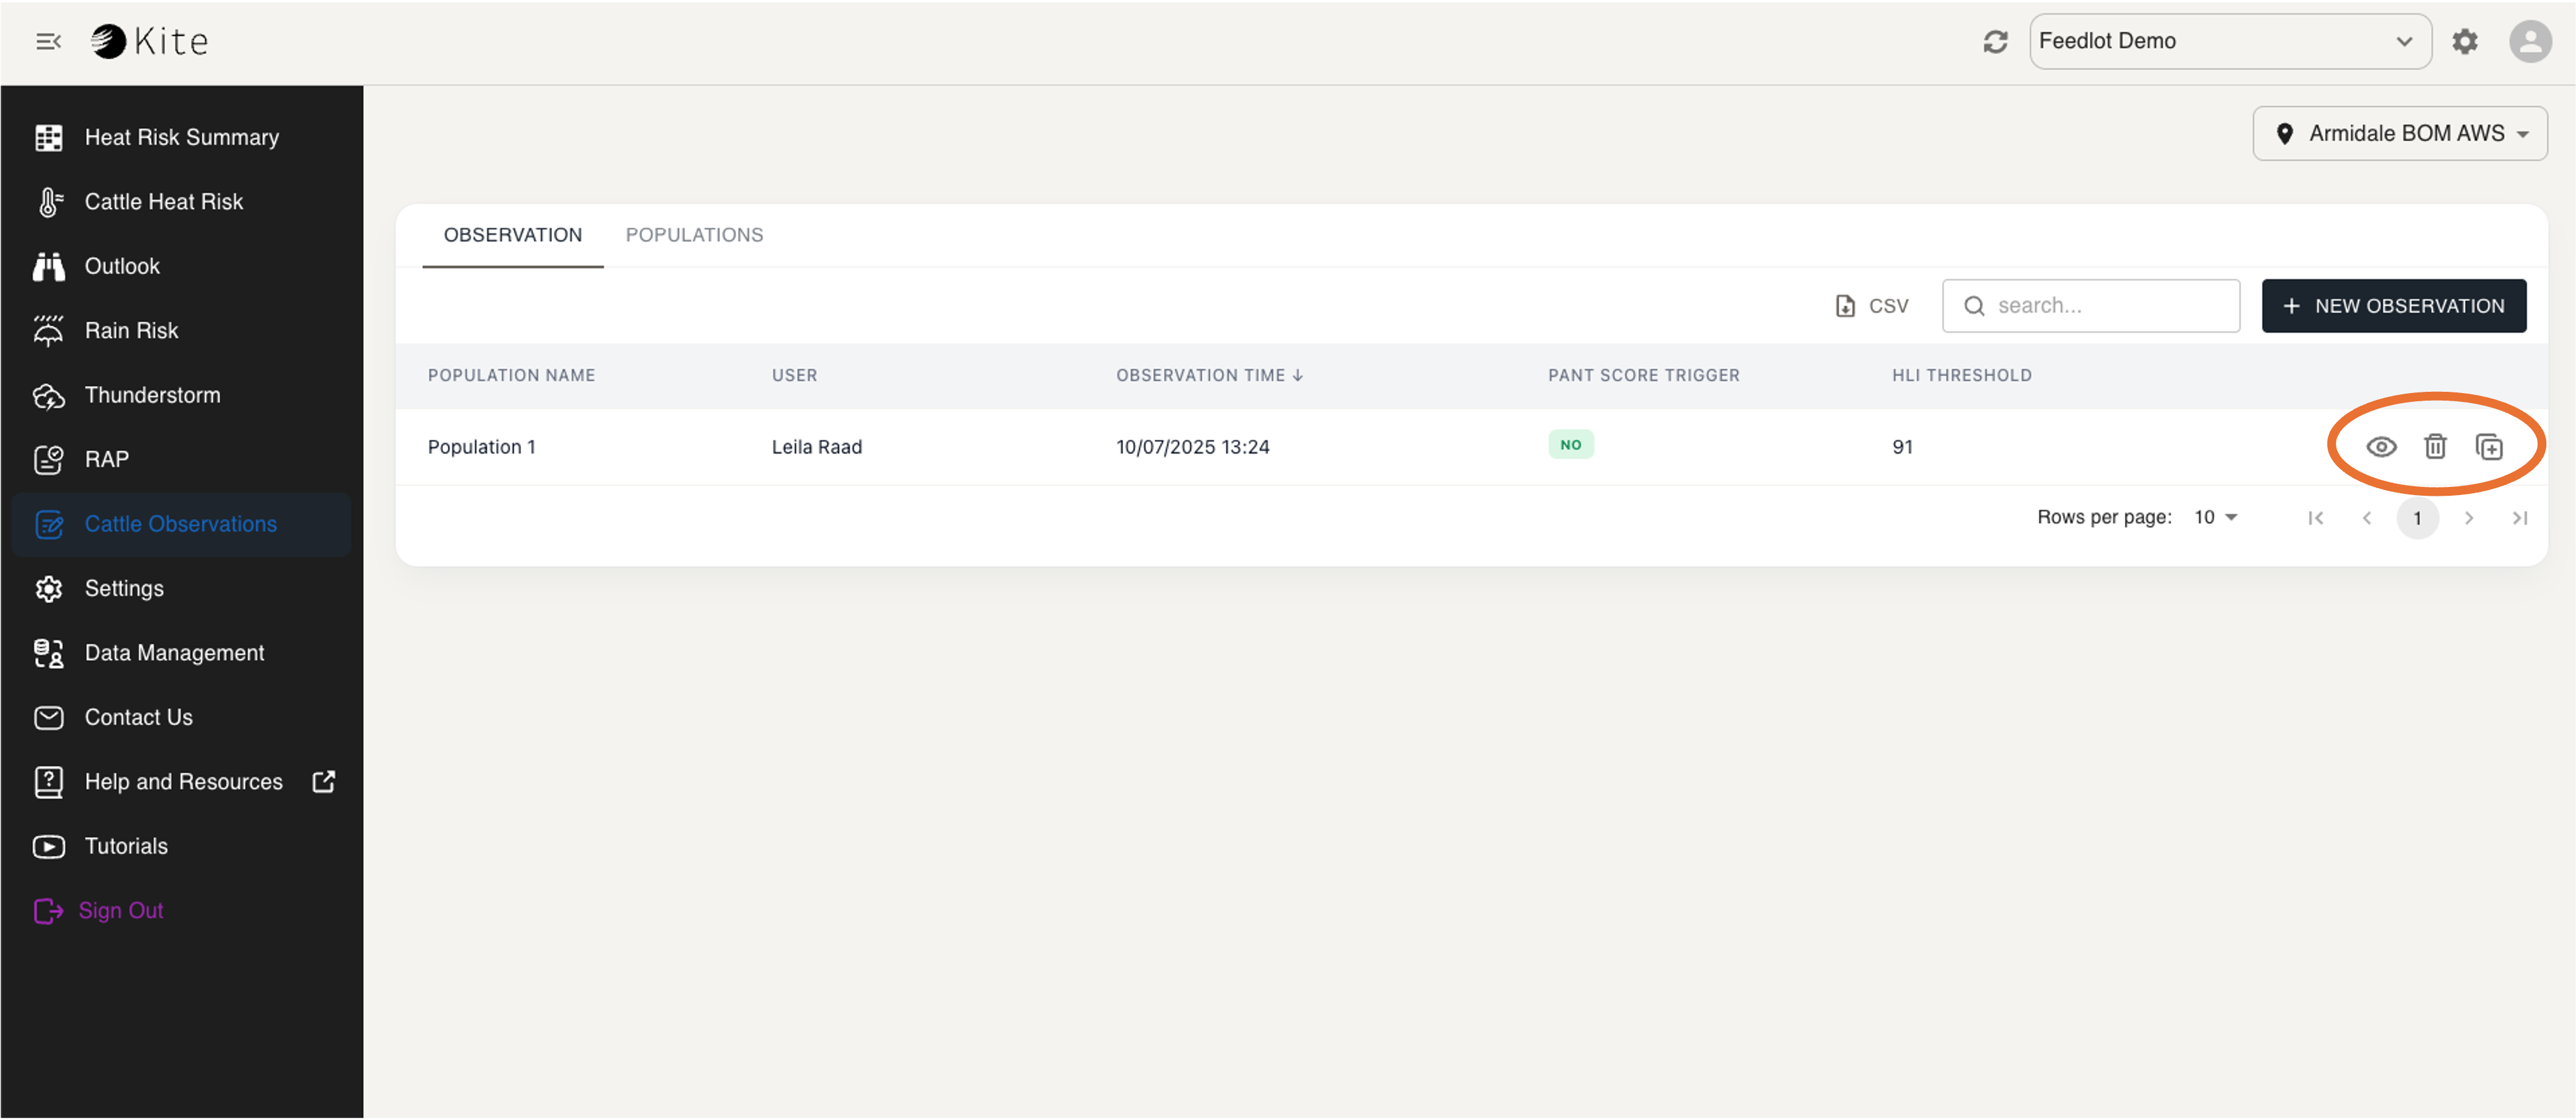
Using the menu circled above, you can:
-
View an observation’s full information by selecting the eye icon.
-
Delete an observation by selecting the bin icon.
-
Clone an observation by selecting the copy icon.
Cloning an observation, similar to cloning a population, allows you to save time when creating new observations. Select the copy icon in the menu circled above and a Clone observation window should pop up, with all fields automatically filled in with the original observation’s information. All you have to do is scroll down, make any changes to the new observation and select Create.
